

Complete Guide to Planning a Custom Kitchen Renovation
A custom kitchen renovation is a big project, but it can transform your home by improving functionality, efficiency, and style. This guide outlines the entire process, from planning and budgeting to selecting materials and managing installation. Here’s what you need to know:
- Plan Ahead: Most homeowners spend about 8.3 months preparing for a kitchen renovation. Start by identifying your needs, creating a list of must-haves, and setting a realistic budget (5–15% of your home’s value).
- Budget Breakdown: Costs vary widely:
- Basic: $13,000–$30,000
- Mid-range: $30,000–$60,000
- High-end: $60,000–$100,000+
- Custom cabinetry often takes up 30–40% of your budget.
- Layout Matters: Efficient designs, like the kitchen work triangle, improve workflow. Choose from layouts like L-shaped, U-shaped, or galley kitchens based on your space.
- Material Choices: Opt for durable materials like plywood cabinets, quartz countertops, and finishes that resist wear. Custom cabinetry offers smart storage solutions, like pull-out shelves and Lazy Susans.
- Permits and Professionals: Structural changes often require permits in Canada, especially in Ontario. Work with licensed contractors to ensure compliance with local codes.
- Timeline: Renovations typically take 6–12 weeks, with custom materials requiring 6–12 weeks of lead time. Plan for a temporary kitchen during construction.
- Installation and Inspections: Coordinate installation steps carefully and inspect all work for quality – level cabinets, seamless countertops, and proper plumbing and electrical setups.
10 Step Beginner Guide To Kitchen Design in 2026
sbb-itb-cb01839
Step 1: Identify Your Kitchen Needs and Priorities
Before diving into materials or layouts, take a moment to think about how your household actually uses the kitchen. This can help you avoid costly missteps, like investing in high-end appliances that go unused or opting for an open-concept design when you rarely host guests.
Review How You Use Your Kitchen Daily
Start by evaluating your cooking habits. Are you more into quick, simple meals, or do you often whip up elaborate dishes? If your needs are minimal, you probably don’t need extras like pull-out spice racks or built-in tray dividers. But if you’re an avid cook, you’ll want plenty of counter space, organized storage for tools, and maybe even professional-grade appliances.
Think about how often you entertain. If hosting is a regular occurrence, an open-concept layout with ample seating and wide walkways can make a huge difference. On the other hand, if big gatherings aren’t your thing, you might prefer to use that space for extra storage or prep areas.
Don’t forget to consider the needs of everyone in your household. Families with young kids might prioritize durable, easy-to-clean finishes and safety features to keep sharp or hazardous items out of reach. Jot down any current frustrations – like cramped spaces or bad lighting – to help guide your design choices. These insights will form the foundation for your feature list.
Create a List of Required Features
Using what you’ve learned about your daily habits, start building a list of features. Break it into two categories: must-haves and nice-to-haves. For example, must-haves might include things like a prep island, deep drawers for pots and pans, or a pantry with pull-out shelves. Nice-to-haves could be extras like a built-in coffee station or a wine cooler. This clear separation will help you stay focused, especially if your budget is tight.
Also, think about how long you plan to stay in your home. If you’re planning to sell in the next five years, it’s smart to stick with features that boost resale value, like neutral finishes and efficient layouts. But if this is your forever home, you can focus on personal touches that suit your taste. A household meeting can also help ensure everyone’s needs are covered, from the main cook to family members who use the kitchen for homework or hanging out. This prioritized list will serve as a roadmap for your budgeting and design choices as you move forward.
Step 2: Set Your Renovation Budget
Kitchen Renovation Budget Breakdown and Cost Guide
Once you’ve sorted out your renovation priorities, the next step is figuring out how much you can realistically spend. A clear budget helps avoid overspending on extras while ensuring there’s enough to cover the essentials. In Canada, costs for labour and materials can vary a lot depending on where you live. For instance, urban areas like the Greater Toronto Area (GTA) and Vancouver tend to have higher labour rates and material costs compared to rural regions.
Calculate Expected Costs
The cost of a kitchen renovation depends on the scope of work, materials used, and location. Here’s a general breakdown:
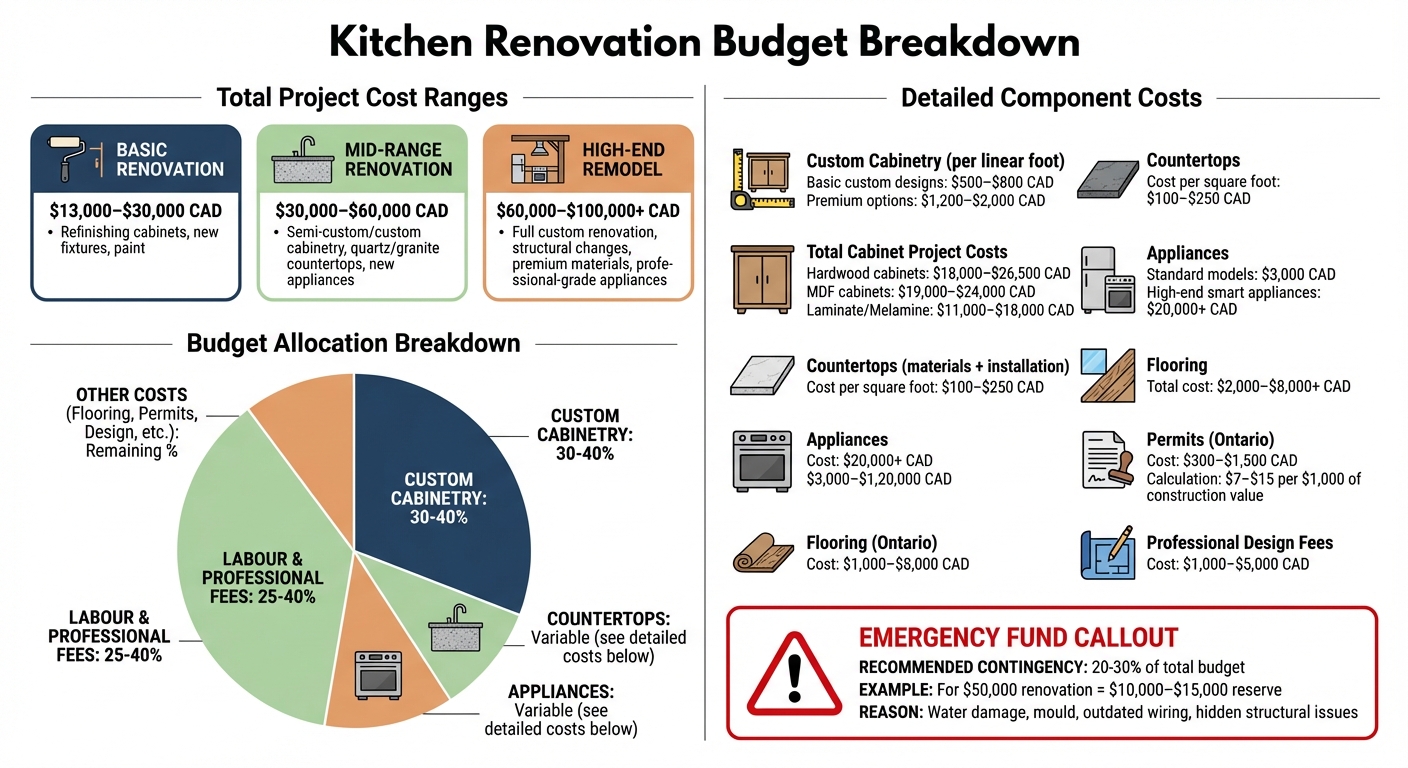
- Basic renovation: This includes refinishing cabinets, adding new fixtures, and a fresh coat of paint. Expect to spend between $13,000 and $30,000.
- Mid-range renovation: If you’re looking for semi-custom or custom cabinetry, quartz or granite countertops, and new appliances, the budget typically ranges from $30,000 to $60,000.
- High-end remodel: A full custom renovation with structural changes, premium materials, and professional-grade appliances can cost $60,000 to $100,000 or more.
Custom cabinetry is often the biggest expense, consuming 30–40% of your budget. For basic custom designs, costs range from $500 to $800 per linear foot, while premium options can go up to $1,200–$2,000 per linear foot. Labour and professional fees can add another 25–40% to the total. Countertops, including materials and installation, typically cost $100–$250 per square foot. Appliance packages vary widely, from $3,000 for standard models to $20,000 or more for high-end smart appliances.
Other costs to keep in mind:
- Flooring: $2,000–$8,000+
- Permits: Around $300–$1,500 in Ontario
- Professional design fees: Approximately $1,000–$5,000
If your renovation involves structural changes – like moving plumbing, upgrading electrical systems, or removing walls – these modifications can add thousands to your budget and often require municipal permits. To get a clear picture of costs, request detailed quotes from at least three licensed contractors. Compare their labour rates, timelines, and scope of work. Once you have your estimates, it’s smart to set aside funds for unexpected expenses.
Set Aside Emergency Funds
Even with careful planning, surprises can pop up during a renovation – things like water damage, mould, outdated wiring, or hidden structural issues. To handle these, set aside a contingency fund of 20–30%. For example, on a $50,000 renovation, this would mean reserving $10,000–$15,000.
"One of the biggest budget pitfalls is making changes mid-project. Each modification adds labour time and material costs." – Artisan Contracting
To protect your emergency fund, finalize all material choices and layouts before construction begins. By locking in your design early and maintaining a healthy reserve, you’ll be better equipped to tackle surprises without throwing your project off track.
Step 3: Plan Your Kitchen Layout
Planning your kitchen layout is all about making the space work for you. Start by focusing on the placement of the sink, stove, and fridge – keeping them at practical distances from each other for smooth functionality. Once you’ve set your budget, a well-thought-out layout becomes essential. It ensures a seamless workflow in your kitchen and helps guide accurate material orders and custom cabinetry choices as you move forward.
Review Common Kitchen Layouts
Different layouts cater to different needs and spaces. Here’s a quick look at some popular options:
- Galley kitchens: These feature two parallel walls of cabinets and appliances. They work well for single cooks but can feel tight in smaller spaces.
- L-shaped layouts: With cabinets and appliances on two adjoining walls forming an "L", this layout offers flexibility and an open feel, ideal for entertaining.
- U-shaped layouts: Surrounding you on three sides with cabinets and counters, this design maximizes storage and prep space. However, it requires a larger area to avoid feeling closed in.
If you have enough room, an island layout adds a freestanding counter to your L or U-shaped design. It’s great for extra prep space and becomes a social hub. For kitchens where a full island isn’t feasible, a peninsula (or G-shaped layout) is a smart alternative. It connects to your main cabinetry, offering similar benefits but requiring less clearance. Keep in mind, walkways should be at least 42 inches wide for single cooks and 48 inches for households with multiple cooks.
Apply the Work Triangle Principle
The work triangle is all about efficiency. It connects the sink (cleaning), stove (cooking), and refrigerator (storage) – the three busiest spots in the kitchen. For best results, each side of the triangle should be between 4 and 9 feet, with the total perimeter falling between 13 and 26 feet. A triangle smaller than 12 feet can feel cramped, while one larger than 26 feet might leave you running laps during meal prep.
Keep high-traffic areas out of the work triangle. Allow 15–18 inches of counter space on either side of the cooktop and 24 inches beside the sink for convenience. Place the dishwasher within one step of the sink (around 36 inches) to make clean-up easier. Also, ensure the fridge door opens toward a counter where groceries can be unloaded. Once the layout feels right, you’re ready to move on to cabinetry and material selection.
Visualize Your Design with 3D Tools
Seeing your kitchen design come to life is easier than ever with 3D tools. These tools let you experiment with custom cabinetry, appliances, and layouts before construction starts. Companies like Alliance Millwork offer 3D design services, helping homeowners visualize how their custom cabinets will fit and function. You can also try online planners to test different configurations and see how they work with your space’s dimensions
Step 4: Select Custom Cabinets and Materials
Picking the right cabinets and materials is a key part of creating a durable and stylish kitchen. Custom cabinetry typically takes up about 35% to 40% of your renovation budget. Canadian homes come with their own set of challenges – fluctuating humidity, temperature changes, and daily wear – so it’s important to choose materials that can handle these conditions. With your layout finalized, this step is where functionality and design come together.
Choose Cabinet Materials and Finishes
Start by focusing on the cabinet box construction. Plywood is a strong choice because its layered build resists both warping and moisture. For painted finishes, MDF works well, offering a smooth and durable surface. If you’re placing cabinets near water sources like sinks or dishwashers, consider High-Density Fiberboard (HDF) or marine-grade plywood, as they can handle steam and occasional leaks without swelling.
Finishes are just as important as the materials themselves. Conversion varnish and UV-cured urethane finishes provide excellent resistance to moisture, scratches, and sunlight fading. Stained finishes enhance the natural beauty of wood but require occasional polishing, while painted finishes fit modern designs and are easier to maintain. Glossy finishes are simple to clean but tend to show fingerprints, whereas matte finishes hide smudges but may highlight scratches. To keep your cabinets in good condition, aim to maintain indoor humidity levels between 35% and 50%, especially in Canada’s variable climate.
Maximize Storage with Smart Solutions
Quality materials are only part of the equation – smart storage features can make your kitchen even more efficient. Custom cabinetry allows you to make the most of every centimetre. For example, pull-out shelves in deep cabinets save you from rummaging through stacked items, and Lazy Susans make corner cabinets fully accessible. Vertical spice racks and tray dividers help keep essential items organized and easy to reach.
Don’t overlook creative solutions like toe-kick drawers, which use the space at floor level to store flat items like baking sheets. Appliance garages can keep small devices out of sight, reducing countertop clutter. Deep drawers for pots and pans are a better option than traditional lower shelves, as they prevent overloading and make access easier. Companies like Alliance Millwork offer custom inserts for cutlery, built-in cutting boards, and hidden pull-out pantries that fit into narrow spaces. Well-designed wall cabinets can hold 50–100 lbs per shelf, while reinforced base cabinets can handle 150–300 lbs.
Compare Wood Types for Cabinets
When it comes to wood, each type has its own look, durability, and care requirements.
- Maple: Known for its smooth, uniform grain and durability, maple is easy to maintain and works well with both paint and stain.
- Oak: Features a strong, prominent grain and excellent durability, making it a timeless choice that hides minor damage.
- Cherry: Offers rich tones that deepen over time but needs moderate care due to its sensitivity to sunlight.
| Wood Type | Durability | Appearance | Maintenance | CAD Price (sq. ft.) |
|---|---|---|---|---|
| Oak | Very High | Prominent grain, rustic | Requires sealing to prevent drying | $50–$100 |
| Maple | High | Light, uniform, smooth | Low; moisture resilient | $60–$110 |
| Cherry | Moderate-High | Rich reddish-brown; darkens with age | Periodic polishing to maintain lustre | $70–$150 |
| Birch | Moderate | Fine grain, pale yellow | Easy to clean; needs regular sealing | $30–$60 |
| Ash | High | Distinct grain; varied grey/white tones | Strong fibres mask minor scratches | $40–$70 |
Premium options like walnut and hickory offer something extra. Walnut stands out for its deep, dark brown tones and elegant grain, while hickory is incredibly durable with striking grain and colour variations. For total project costs, expect to pay $18,000–$26,500 for hardwood cabinets, $19,000–$24,000 for MDF, and $11,000–$18,000 for laminate or melamine. To ensure your cabinets last, opt for soft-close hinges and full-extension drawer glides to reduce wear and tear on doors and drawers.
Step 5: Handle Permits, Timelines, and Contractors
Once you’ve chosen your materials and cabinets, it’s time to tackle permits, timelines, and contractor coordination. These steps are crucial for keeping your project on track and ensuring it meets local regulations.
Obtain Required Permits
In Ontario, kitchen renovations often require permits, especially if you’re making structural, electrical, or plumbing changes. Here’s a quick breakdown:
- Building permits: Needed for structural work, such as removing load-bearing walls, relocating plumbing fixtures, modifying HVAC systems, or changing windows.
- Electrical permits: Governed by the Electrical Safety Authority (ESA), these are required for almost all electrical work, including adding outlets or upgrading panels.
- Plumbing permits: Necessary if you’re moving water lines, drains, or installing new fixtures.
Cosmetic updates usually don’t need permits. However, if you live in a condo, you’ll also need approval from your Condo Board, which often involves a Renovation Agreement and proof of insurance. Permit fees range between $7 and $15 per $1,000 of construction value, so for a $50,000 renovation, you’re looking at approximately $350–$750. Skipping permits could lead to fines of up to $50,000 for individuals and $100,000 for corporations in Ontario.
Apply for permits as soon as your plans are finalized, as the approval process can take anywhere from 2 to 8 weeks. Your plans need to comply with the Ontario Building Code (OBC) and local zoning rules, and inspections are required at various stages: rough-ins (framing, plumbing, electrical), insulation and vapour barrier, and final completion. Make sure not to cover up any work until it has been inspected and approved by city officials.
Once permits are in place, you can focus on setting construction timelines.
Understand Project Timelines
A custom kitchen renovation typically takes 6 to 12 weeks from demolition to completion. For more intricate projects, this may stretch to 10–16 weeks. Interestingly, homeowners spend an average of 8.3 months planning their kitchen but only 4.5 months on the actual construction.
"Kitchen renovations demand almost twice as much planning time as the actual construction work. Planning is essential to make sure you can stay on budget and get everything that you want. So take the time to think it through." – Sujay Ram, Peace of Mind Interiors
Here’s a general timeline to keep in mind:
- 4–8 weeks for design and planning
- 1–2 weeks for demolition
- 2–4 weeks for rough-ins (plumbing, electrical, etc.)
- 3–5 weeks for installation
Custom cabinets often require a 6–10 week lead time, and countertops are templated after cabinet installation, with fabrication taking another 7–10 business days. To avoid delays, order custom materials at least 8–12 weeks before starting demolition.
Set up a temporary kitchen with essentials like a microwave, kettle, and mini-fridge to maintain some normalcy during the renovation. If possible, consider renovating during the winter, as contractors in Ontario may offer better pricing and quicker turnaround times during their off-peak season.
Sticking to timelines becomes much easier when you have skilled professionals on your team.
Work with Professional Service Providers
Hiring experienced professionals ensures your renovation meets building codes, stays on schedule, and avoids costly mistakes. Licensed contractors can manage subcontractors, handle permits, oversee inspections, and coordinate the entire project. This reduces legal and safety risks, as well as the chance of fines for unpermitted work.
When choosing contractors, evaluate them using the "Five C’s":
- Competence: Look for relevant experience.
- Credentials: Verify licensing.
- Coverage: Ensure they have proper insurance.
- Communication skills: Clear communication is key.
- Compatibility: Make sure their working style suits you.
Meet with at least three contractors, review portfolios of similar projects, and contact three references from recent jobs. Always request detailed written quotes that break down labour, materials, and other costs instead of vague estimates.
Full-service providers like Alliance Millwork simplify the process by managing design, manufacturing, and installation under one roof. This minimizes communication errors and ensures technical drawings align with approved site measurements, reducing the risk of inspection issues. Confirm that your contractor holds comprehensive insurance and certifications, such as a RenoMark designation or membership in the Canadian Home Builders’ Association (CHBA). To stay on top of things, schedule weekly check-ins to address any issues before they escalate.
Step 6: Order Materials and Prepare Your Home
With permits secured and timelines established, it’s time to focus on ordering materials and getting your home ready. Timing is everything here – delays in material delivery can disrupt your entire project.
Order Custom Materials Early
Custom materials often come with lengthy lead times. For instance, custom cabinetry typically takes 6–12 weeks from the moment your design is approved to delivery. It’s best to place your order before demolition begins. Similarly, appliances should be ordered 8–12 weeks in advance, ensuring their dimensions and model numbers are finalized.
Countertops have a unique timeline. They require a professional template, which can only be created after your cabinets are installed. Once templated, fabrication and installation add another 3 to 4 weeks. This means there will likely be a period when your kitchen is functional but lacks finished surfaces.
When materials arrive, inspect them carefully for damages or errors. Store them in a cool, dry space – like a garage – to prevent any issues, especially during colder months.
| Material Type | Estimated Lead Time | Ordering Priority |
|---|---|---|
| Custom Cabinetry | 6–12 weeks | High (Order before demo) |
| Appliances | 8–12 weeks | High (Order before demo) |
| Custom Lighting | 4–6 weeks | Medium |
| Countertops | 2–4 weeks | Post-Cabinet Installation |
| Special Order Flooring | 2–3 weeks | Medium |
| Specialty Plumbing | 2–4 weeks | Medium |
Companies like Alliance Millwork handle everything from design to installation, ensuring your custom cabinetry arrives on time. Once your materials are secured, shift your focus to preparing your home for the renovation.
Set Up Your Kitchen for Renovation
Before demolition begins, empty all cabinets and drawers to keep your belongings safe and make the process faster. Set up a temporary kitchen in an alternate space, like a basement, laundry room, or spare bedroom. Include essentials like a work surface, mini-fridge, microwave, kettle, and coffee maker. If possible, move your full-sized refrigerator to this area; otherwise, rely on a mini-fridge.
For dishwashing, use an alternative sink, such as one in the bathroom, laundry room, or utility area. Simplify cleanup by using disposable plates and utensils during this period. Appliances like electric griddles, slow cookers, or Instant Pots can help you manage cooking without a stove. To make life easier, consider preparing and freezing meals ahead of time – kitchen renovations can stretch from 10 to 16 weeks.
Protect your home from dust and debris by sealing doorways with plastic sheeting and laying protective coverings on floors in areas not being renovated. Finally, set clear expectations with your family about the temporary adjustments you’ll need to make.
Step 7: Manage Installation and Complete Your Kitchen
With your design and materials ready, it’s time to bring your custom kitchen to life. This final step focuses on installation and fine-tuning every detail to ensure your kitchen looks and functions exactly as planned. Careful coordination and thorough inspections are key to making sure everything comes together seamlessly.
Coordinate the Installation Sequence
The installation process starts with structural elements like plumbing, electrical work, and HVAC systems. Once these are in place, move on to insulation and drywall. Next comes the flooring, and the sequence here depends on the material you’ve chosen. Permanent options like tile or hardwood should go in before the cabinets to create a level surface and eliminate the need for quarter-round trim. Floating floors, such as vinyl or laminate, are best installed after the cabinetry.
Once the cabinets are installed, precise countertop templating begins. Materials like quartz and granite require exact measurements since they can’t be adjusted on-site. Fabrication for these countertops typically takes between 1 and 4 weeks. After the countertops are installed, the backsplash follows to ensure proper alignment. The final steps include installing plumbing fixtures, lighting, appliances, and hardware.
Inspect Workmanship and Materials
As each element is installed, take the time to conduct detailed inspections. Don’t rely solely on appearances – run your hand over surfaces like countertops to check for defects or uneven seams. Ensure cabinets are perfectly level and that there are no gaps between them and the walls or ceiling. Test all doors and drawers to confirm they open and close smoothly without interference.
Pay special attention to electrical and plumbing work. Outlets within six feet of a sink should have GFCI protection, and plumbing fixtures need to be secure, with hot water on the left and cold on the right. For tile work, check for "lippage", or uneven edges, and make sure grout lines are straight and symmetrical. Finally, inspect caulking at seams and joints to ensure it’s neat, waterproof, and resistant to mould.
| Inspection Category | Key Quality Check | Standard for Acceptance |
|---|---|---|
| Cabinets | Level and Plumb | Cabinets must be perfectly vertical and horizontal |
| Countertops | Seam Integrity | Seams should be tight, level, and consistent in appearance |
| Electrical | GFCI Protection | Outlets near water sources must have GFCI protection |
| Plumbing | Fixture Security and Orientation | Fixtures must be secure, with correct hot and cold placement |
| Tiling | Lippage | Tiles should be flush with even grout lines |
Complete Your Kitchen with Finishing Details
The finishing touches are where style meets practicality. Choose hardware like knobs, pulls, and handles that complement your cabinetry while adding functional upgrades like soft-close hinges, pull-out spice racks, or deep drawer organizers for added convenience.
Lighting is another critical element. A well-lit kitchen typically includes three layers: ambient lighting for overall brightness (like recessed ceiling lights), task lighting for specific areas such as under-cabinet LED strips, and accent lighting to highlight features like glass-front cabinets or pendant lights over an island. Dimmer switches can add versatility, letting you shift from bright task lighting to a softer, more relaxed atmosphere.
Finally, details like crown moulding, baseboards, and floor trims give your kitchen a polished, cohesive look. If you’ve opted for panel-ready appliances or built-in features, ensure they are seamlessly integrated into the overall design. These finishing touches reflect the effort and planning that went into creating your dream kitchen, and Alliance Millwork’s comprehensive service ensures every detail aligns perfectly with your vision.
Conclusion
This guide has outlined the essential steps involved in a custom kitchen renovation. From identifying your needs and setting a budget to selecting the right materials, obtaining permits, and managing installation, every stage plays a vital role. On average, homeowners dedicate about 8.3 months to planning their kitchen projects – a time investment that leads to improved functionality, smarter storage solutions, and a boost in property value. Setting aside a contingency fund and ordering materials early are practical ways to avoid delays and keep costs under control.
Financial planning and adhering to regulations are key to ensuring a smooth renovation process. Hiring experienced professionals helps align your vision with local codes and standards. For instance, in Ontario, failing to secure proper permits can result in fines as high as $50,000 for a first offence. Skilled experts bring a blend of precision and creativity, transforming your kitchen into a space that is not only visually appealing but also built to last.
Every choice you make, from budgeting to the smallest design element, contributes to creating a kitchen that will serve you well for years to come.
"High-end custom kitchen cabinets don’t just elevate the aesthetic appeal of your space – they also enhance functionality, durability, and value." – Alliance Millwork
Alliance Millwork offers a comprehensive service experience, covering everything from initial consultations and 3D designs to in-house manufacturing and expert installation. Their mastery of premium materials like walnut and cherry, paired with clever storage innovations such as hidden pull-out pantries and integrated LED lighting, ensures a kitchen that is both stylish and practical. Partnering with professionals ensures a seamless renovation process that enhances your home’s functionality and long-term value.
FAQs
What should I splurge on vs save on in a custom kitchen?
In a custom kitchen, it’s smart to invest in high-quality cabinetry and durable materials. These not only stand the test of time but also improve functionality and can boost your home’s resale value. Premium cabinets and sturdy hardware are well worth the expense.
On the other hand, you can save by opting for more affordable countertops, basic appliances, or standard fixtures. These are easier to upgrade down the line. By focusing your budget on structural essentials and trimming costs on replaceable elements, you can strike the right balance for your kitchen renovation.
How do I plan for life without a kitchen during the reno?
When your kitchen is out of commission during renovations, having a temporary kitchen setup can be a lifesaver. Equip it with essentials like a microwave, mini-fridge, and a few portable appliances – think toaster ovens or electric kettles. These basics will help you manage meals without feeling completely uprooted.
Meal planning is key. Stock up on non-perishable items like canned goods, pasta, and snacks. Prepping meals in advance or relying on simple, no-cook recipes can save you both time and stress. To make cleanup easier, consider using disposable plates, cups, and utensils.
It’s also important to stay in sync with your contractors. Discuss timelines and any potential delays so you can plan accordingly. Don’t forget to protect nearby spaces from dust and debris – plastic sheeting or painter’s tape can work wonders here.
While a kitchen renovation can be disruptive, a little preparation and flexibility can help you keep things running smoothly.
How can I reduce delays from custom cabinets and materials?
When it comes to avoiding delays, early planning is your best friend. Start by creating detailed specifications to ensure your suppliers fully understand your requirements. This step makes it easier for them to deliver exactly what you need.
It’s also smart to build in a 15-20% buffer into your timeline. This extra time can help you handle any unexpected hiccups without derailing your project. Stay in close communication with your cabinet maker – ask about lead times and check in regularly to confirm schedules are on track.
Another tip? Order materials as early as possible. Getting everything ready ahead of time can prevent hold-ups during critical construction phases. Planning ahead now saves you headaches later.